java工具——包管理工具Maven
Maven
优点
- 统一管理jar包,自动导入jar及其以来依赖
- 项目移植之后甚至不需要安装并发工具,只需要maven加命令就能跑,降低学习成本
- 使得项目流水线成为可能,因为使用简单的命令我们就能完成项目的编译,打包,发布等工作,就让程序操作程序成为了可能,大名鼎鼎的jekins也能做到这一点
Maven下载安装
下载binary文件
Maven安装
- 解压
- 配置MAVEN_HOME,为maven的解压
- 配置path,%MAVEN_HOME%\bin
- 使用如下命令验证是否配置成功
Maven核心全局配置文件
1
| \apache-maven-3.6.3\conf\settings.xml
|
配置路径
选择一个位置新建文件夹repository,setting.xml中添加如下标记
1
| <localRepository>D:\program\Maven\repository</localRepository>
|
配置国内镜像
1
2
3
4
5
6
| <mirror>
<id>alimaven</id>
<name>aliyun maven</name>
<url>http://maven.aliyun.com/nexus/content/groups/public/</url>
<mirrorOf>central</mirrorOf>
</mirror>
|
配置全局编译jdk版本
当计算机中有多个版本的jdk时,以下配置是必须的
1
2
3
4
5
6
7
8
9
10
11
12
| <profile>
<id>jdk-11.0.9</id>
<activation>
<activeByDefault>true</activeByDefault>
<jdk>11</jdk>
</activation>
<properties>
<maven.compiler.source>11</maven.compiler.source>
<maven.compiler.target>11</maven.compiler.target>
<maven.compiler.compilerVersion>11</maven.compiler.compilerVersion>
</properties>
</profile>
|
Maven体验
Maven标准目录
1
2
3
4
5
6
7
8
9
10
11
| src
|--main
|--java 源代码目录
|--resources 资源目录
|--test
|--java 测试代码目录
|--resources 测试资源目录
|--target
|--ckasses 编译后的class文件目录
|--test-classes 编译后的测试class文件目录
pom.xml Maven工程配置文件
|
pom.xml基本内容
1
2
3
4
5
6
7
8
9
10
11
12
13
14
15
16
17
| <?xml version="1.0" encoding="UTF-8"?>
<project xmlns = "http://maven.apache.org/POM/4.0.0"
xmlns:xsi = "http://www.w3.org/2001/XMLSchema-instance"
xsi:schemaLocation = "http://maven.apache.org/POM/4.0.0
http://maven.apache.org/xsd/maven-4.0.0.xsd">
<modelVersion>4.0.0</modelVersion>
<groupId>com.companyname.project-group</groupId>
<artifactId>project</artifactId>
<version>1.0</version>
</project>
|
在创建好上述项目结构并配置好maven以及项目pom后,在项目根目录使用如下命令就能利用maven,进行自动的依赖下载,以及项目编译:
Maven生命周期
maven生命周期描述了一个项目从源代码到部署的整个周期
Maven有三个内置的生命周期:
- 清理(clean):为执行一下工作做必要的清理,如删除target文件夹
- 默认(default):真正进行项目编译打包工作的阶段
- 站点(site):生成项目报告,站点,发布站点
默认生命周期包括以下阶段(该阶段经过简化,实际上更加复杂):
- 验证(validate):验证项目是否正确,所有必要信息是否可用
- 编译(compile):编译项目的源代码
- 测试(test):使用合适的单元测试框架测试编译的源代码。这些测试不应该要求代码被打包或部署
- 打包(package):采用编译的代码,并以其可分配格式(如JAR)进行打包
- 验证(verify):对集成测试的结果执行任何检查,以确保满足质量标砖
- 安装(install):将软件包安装到本地存储中,用作本地其他项目的依赖项
- 部署(deploy):在构建环境中完成,将最终的包复制到远程存储以与其他开发人员和项目共享(私服)
Maven的版本规范
所有软件都有版本
Maven使用如下几个要素来定位一个项目,因此它们又称为项目的坐标。
groupId:团体、组织的标识符。团体标识的约定量,它以创建这个项目的组织名称的,逆向域名开头。一般对应着JAVA的包的结构,例如org.apache。artifactId:单独项目的唯一标识符。比如tomcat,commons等。不要再其中使用.version:项目版本packaging:项目的类型,默认是jar,描述了项目打包后的输出,类型为jar的项目产生一个JAR文件,类型为war的项目产生一个web应用。
Maven在版本管理时可以使用几个特殊的字符串 SNAPSHOT,LARESR,RELEASE。比如“1.0-SNAPSHOT”。各个部分的含义和处理逻辑如下说明:
SNAPSHOT 这个版本一般用于开发过程中,表示不稳定版LARESR 指某个特定构件的最新发布,这个发布可能是一个发布版,也可能是一个snapshot版,具体看那个时间最后RELEASE 指最后一个发布版
Idea配置Maven
为当前项目配置
File → Settings → 搜索Maven → Maven home path、User settings file、Local repository
三项分别设置为:
- Maven安装路径
- conf/settings.xml的路径
- repository文件夹的路径
为未来项目配置
New Project Settings → Settings for New Projects… → 搜索Maven → Maven home path、User settings file、Local repository
配置同上
Maven依赖
Maven管理依赖也就是jar包不用我们自己下载,会从一些地方自动下载
Maven 工程中我们依赖在pom.xml文件进行配置完成jar包管理工作(依赖)
在工程中引入某个jar包,只需要在pom.xml中引入jar包的坐标,比如引入log4j的依赖
1
2
3
4
5
6
7
8
| <dependencies>
<dependency>
<groupId>junit</groupId>
<artifactId>junit</artifactId>
<version>4.7</version>
<scope>test</scope>
</dependency>
</dependencies>
|
Maven通过groupId、artifactId与version三个向量来定位Maven仓库其jar包所在的位置,并把对应的jar包引入到工程中来
依赖范围
classpath
编译好的class文件所在的路径
事实上,类加载器(classloader)就是去对应的classpath中加载class二进制文件
maven项目
maven工程会将src/main/java和src/main/recources文件夹下的文件全部打包在classpath中。运行时它们两个文件夹下的文件会被放在一个文件夹下。
maven项目不同的阶段引入到classpath中的依赖是不同的例如
编译时,maven会将与编译相关的依赖引入classpath中测试时,maven会将与测试相关的依赖引入classpath中运行时,maven会将与运行相关的依赖引入classpath中
而依赖范围就是用来控制依赖于这三种classpath的关系
scop标签
scop标签就是依赖范围的配置
该项默认配置为compile,可选配置还有test、provide、runtime、system、import
其中compile、test和provided使用较多
部分jar包指在某一特定时候需要被加载,例如:
servlet-api,运行时其实是不需要的,因为tomcat里有,但编译时需要,因为编译时没有tomcat环境junit,只有在测试的时候才能用到,运行时不需要JDBC,测试时必须要有,编译时不需要,编译时用的都是jdk中的接口,运行时我们才使用反射注册驱动
编译依赖范围(compile)
该范围是默认范围,次依赖范围对于编译、测试、运行三种classpath都有效如
1
2
3
4
5
| <dependency>
<groupId>com.alibaba</groupId>
<artifactId>fastjson</artifactId>
<version>1.2.68</version>
</dependency>
|
测试依赖范围(test)
指对测试classpath有效,编译运行时都无法使用依赖,如junit
1
2
3
4
5
6
| <dependency>
<groupId>junit</groupId>
<artifactId>junit</artifactId>
<version>4.7</version>
<scop>test</scop>
</dependency>
|
已提供依赖范围(provided)
支队编译和测试的classpath有效,对运行的classpath无效,如servlet-api,如果不设置依赖范围,当容器依赖的版本和maven依赖的版本不一致时会引起冲突
1
2
3
4
5
6
| <dependency>
<groupId>javax.servlet</groupId>
<artifactId>javax.servlet-api</artifactId>
<version>4.0.1</version>
<scop>provided</scop>
</dependency>
|
运行时依赖范围(runtime)
只对测试和运行的classpath有效,对编译的classpath无效,如JDBC驱动
1
2
3
4
5
6
| <dependency>
<groupId>mysql</groupId>
<artifactId>mysql-connection-java</artifactId>
<version>5.1.25</version>
<scop>runtime</scop>
</dependency>
|
依赖传递
jar包也是别人写的工程项目,她们也会依赖其他的jar包,传递性让我们可以不用关心我们所依赖的jar包依赖了哪些jar,只要我们添加了依赖,他会自动将所依赖的jar统统依赖进来
依赖传递原则
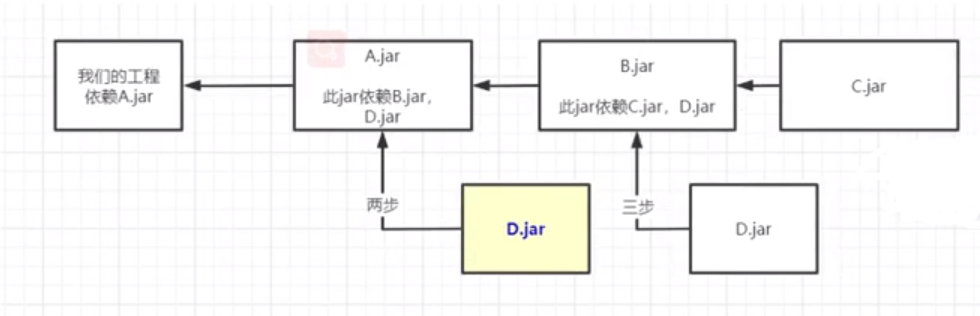
- 最短路径优先原则:如果A依赖了B,B依赖了C,在B和C 中同时依赖了log4j的依赖,并且这两个版本不一致,那么A会根据最短路径原则,在A中会传递过来B的log4j版本
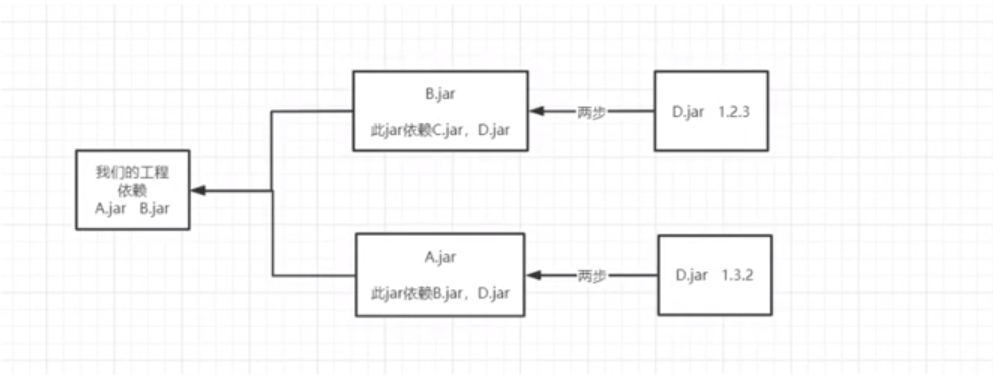
- 路径相同先声明原则:如果我们的工程同时依赖于B和A,B和C没有依赖关系,并且都有D的依赖,且版本不一致,那么会引入在pom.xml中先声明依赖的log4j版本。
1
2
3
4
5
6
7
8
9
10
| <dependency>
<groupId>com.ender</groupId>
<artifactId>B</artifactId>
<version>1.2</version>
</dependency>
<dependency>
<groupId>com.ender</groupId>
<artifactId>A</artifactId>
<version>1.5</version>
</dependency>
|
因为D的1.2.3版本的依赖关系优先得到确定,所以依赖D的1.2.3,因此如果A包中使用了D1.3.2的某些新特性,可能造成A包无法使用的问题,于是就需要把低版本排除,一般高版本会兼容低版本
依赖的排除
对于上例中,我们如果想把低版本的D包排除,就可以做如下设置
1
2
3
4
5
6
7
8
9
10
11
12
13
14
15
16
17
18
19
20
| <dependency>
<groupId>com.ender</groupId>
<artifactId>B</artifactId>
<version>1.2</version>
<exclusions>
<exclusion>
<artifactId>com.ender</artifactId>
<groupId>D</groupId>
</exclusion>
</exclusions>
</dependency>
<dependency>
<groupId>com.ender</groupId>
<artifactId>A</artifactId>
<version>1.5</version>
</dependency>
|
聚合和继承
分布式项目必须使用到该功能
**聚合模块(父模块)**的打包方式必须时pom,否则无法完成构建
在聚合多个项目时,如果这些聚合的项目中需要引入相同的jar,那么可以将这些jar写入父pom中,各个子项目集成该pom即可。父模块的打包方式必须为pom,否则无法构建项目
通过修改pom.xml来表明继承关系:
父模块pom:
1
2
3
4
5
6
7
8
9
10
11
12
13
14
15
16
17
18
19
20
21
22
23
24
25
26
27
28
29
30
31
| <?xml version="1.0" encoding="UTF-8"?>
<project xmlns="http://maven.apache.org/POM/4.0.0"
xmlns:xsi="http://www.w3.org/2001/XMLSchema-instance"
xsi:schemaLocation="http://maven.apache.org/POM/4.0.0 http://maven.apache.org/xsd/maven-4.0.0.xsd">
<modelVersion>4.0.0</modelVersion>
<groupId>org.example</groupId>
<artifactId>maven-test</artifactId>
<version>1.0-SNAPSHOT</version>
<modules>
<module>child-one</module>
</modules>
<properties>
<maven.compiler.source>11</maven.compiler.source>
<maven.compiler.target>11</maven.compiler.target>
</properties>
<packaging>pom</packaging>
<dependencies>
<dependency>
<groupId>commons-lang</groupId>
<artifactId>commons-lang</artifactId>
<version>2.1</version>
</dependency>
</dependencies>
</project>
|
子模块POM:
1
2
3
4
5
6
7
8
9
10
11
12
13
14
15
16
17
18
19
20
| <?xml version="1.0" encoding="UTF-8"?>
<project xmlns="http://maven.apache.org/POM/4.0.0"
xmlns:xsi="http://www.w3.org/2001/XMLSchema-instance"
xsi:schemaLocation="http://maven.apache.org/POM/4.0.0 http://maven.apache.org/xsd/maven-4.0.0.xsd">
<parent>
<artifactId>maven-test</artifactId>
<groupId>org.example</groupId>
<version>1.0-SNAPSHOT</version>
</parent>
<modelVersion>4.0.0</modelVersion>
<artifactId>child-one</artifactId>
<properties>
<maven.compiler.source>11</maven.compiler.source>
<maven.compiler.target>11</maven.compiler.target>
</properties>
</project>
|
可被继承的POM元素如下:
- groupId:项目子ID,项目坐标的核心元素
- version:项目版本,项目坐标的核心元素
- properties:自定义的Maven属性,一般用于统一制定各个依赖的版本好
- dependencies
- dependencyManagement:项目依赖管理配置
- repositories
- build:包括项目的源码目录配置、输出目录配置、插件配置、插件管理配置等
实现父子工程统一版本管理
对于一个父子嵌套的工程,当我们要对所有子工程进行统一管理时,常常需要所有子工程使用统一的插件版本,我们可能会使用
1
2
3
4
5
6
7
| <dependencies>
<dependency>
<groupId>commons-lang</groupId>
<artifactId>commons-lang</artifactId>
<version>2.1</version>
</dependency>
</dependencies>
|
这样的方式在父工程的pom中配置,但是这样在打包时,子工程无论用没用到这个插件,都会将其打包进该工程中,因此我们需要使用别的方法进行版本管理:
首先在父工程的pom中配置:
1
2
3
4
5
6
7
8
9
10
11
12
13
14
15
|
<properties>
<fastjson-version>1.2.68</fastjson-version>
</properties>
<dependenciesManagement>
<dependencies>
<dependency>
<groupId>com.alibaba</groupId>
<artifactId>fastjson</artifactId>
<version>${fastjson-version}</version>
</dependency>
</dependencies>
</dependenciesManagement>
|
子工程pom中配置:
1
2
3
4
5
6
7
|
<dependencies>
<dependency>
<groupId>com.alibaba</groupId>
<artifactId>fastjson</artifactId>
</dependency>
</dependencies>
|
POM文件
基础配置
一个典型的pom.xml文件配置如下:
点击查看配置
1
2
3
4
5
6
7
8
9
10
11
12
13
14
15
16
17
18
19
20
21
22
23
24
25
26
27
28
29
30
31
32
33
34
35
36
37
38
39
40
41
42
43
44
45
46
47
48
49
50
| <project xmlns = "http://maven.apache.org/POM/4.0.0"
xmlns:xsi = "http://www.w3.org/2001/XMLSchema-instance"
xsi:schemaLocation = "http://maven.apache.org/POM/4.0.0
http://maven.apache.org/xsd/maven-4.0.0.xsd">
<modelVersion>4.0.0</modelVersion>
<groupId>com.companyname.project-group</groupId>
<artifactId>project</artifactId>
<version>1.0.0-SNAPSHOT</version>
<packaging>jar</packaging>
<properties>
<file.encoding>UTF-8</file.encoding>
<java.source.version>1.8</java.source.version>
<java.target.version>1.8</java.target.version>
</properties>
<dependencies>
<dependency>
<groupId>junit</groupId>
<artifactId>junit</artifactId>
<version>4.12</version>
<scop>compile</scop>
<optional>false</optional>
<exclusions>
<exclusion>
<groupId>commons-lang</groupId>
<artifactId>commons-lang</artifactId>
</exclusion>
</exclusions>
</dependency>
</dependencies>
</project>
|
一般来说,上面的几个配置项对任何项目都是必不可少的,定义了项目的基本属性
构建配置
点击查看配置
1
2
3
4
5
6
7
8
9
10
11
12
13
14
15
16
17
18
19
20
21
22
23
24
25
26
27
28
29
30
31
32
33
34
35
36
37
38
39
40
41
42
43
44
45
46
47
48
49
50
51
52
53
54
55
56
57
58
59
60
61
62
| <build>
<finalName>myProjectName</finalName>
<directory>${basedir}/target</directory>
<sourceDirectory>${basedir}\src\main\java</sourceDirectory>
<testSourceDirectory>${basedir}\src\test\java</testSourceDirectory>
<outputDirectory>${basedir}\target\classes</outputDirectory>
<testOutputDirectory>${basedir}\target\test-classes</testOutputDirectory>
<resources>
<resource>
<directory>src/main/java</directory>
<inlcudes>
<include>**/*.properties</include>
<include>**/*.xml</include>
</inlcudes>
<filtering>false</filtering>
</resource>
<resource>
<directory>src/main/resources</directory>
<inlcudes>
<include>**/*.properties</include>
<include>**/*.xml</include>
</inlcudes>
<filtering>false</filtering>
</resource>
</resources>
<testResources>
<testResource>
<targetPath />
<filtering />
<directory />
<includes />
<excludes />
</testResource>
</testResources>
<plugins>
<plugin>
...具体在插件使用中了解
</plugin>
</plugins>
<pluginManagement>
<plugins>...</plugins>
</pluginManagement>
</build>
|
常用的几个配置
处理资源被过滤的问题
1
2
3
4
5
6
7
8
9
10
11
12
13
14
15
16
17
18
19
20
| <build>
<resources>
<resource>
<directory>src/main/java</directory>
<inlcudes>
<include>**/*.properties</include>
<include>**/*.xml</include>
</inlcudes>
<filtering>false</filtering>
</resource>
<resource>
<directory>src/main/resources</directory>
<inlcudes>
<include>**/*.properties</include>
<include>**/*.xml</include>
</inlcudes>
<filtering>false</filtering>
</resource>
</resources>
</build>
|
添加本地jar包
1
2
3
4
5
6
7
8
9
10
11
12
13
14
|
<plugin>
<groupId>org.apache.maven.plugins</groupId>
<artifactId>maven-compiler-plugin</artifactId>
<configuration>
<source>1.8</source>
<target>1.8</target>
<encoding>UTF-8</encoding>
<compilerArguments>
<extdirs>${project.basedir}/src/main/webapp/WEB-INF/lib</extdirs>
</compilerArguments>
</configuration>
</plugin>
|
仓库配置
1
2
3
4
5
6
7
8
9
10
11
12
13
| <repositories>
<repossitory>
<id>alimaven</id>
<name>aliyun maven</name>
<url>http://maven.aliyun.com/nexus/content/groups/public/</url>
<releases>
<enabled>true</enabled>
</releases>
<snaphosts>
<enabled>false</enabled>
</snaphosts>
</repossitory>
</repositories>
|
pom.xml中的仓库和setting.xml里的仓库功能一样,区别在于pom里配置的仓库时个性化的,比如,公司里的settings文件时公用的,若有项目都用一个settings文件,但各个子项目却会引用不同的第三方库,所以需要正在pom.xml里设置自己需要的仓库地址。
项目信息配置(了解)
点击查看配置
1
2
3
4
5
6
7
8
9
10
11
12
13
14
15
16
17
18
19
20
21
22
23
24
25
26
27
28
29
30
31
32
33
34
35
36
37
38
39
40
41
42
43
44
45
46
47
48
49
50
51
52
53
54
55
56
57
58
59
60
61
62
63
64
65
66
67
68
69
70
71
72
73
74
75
76
77
78
79
80
81
82
83
84
85
86
87
88
89
90
91
92
93
94
95
96
97
98
99
100
101
102
103
104
105
106
107
108
109
110
111
112
113
114
115
116
117
118
119
120
121
122
123
124
125
126
127
128
129
130
131
132
133
134
135
136
137
138
139
140
141
142
143
144
|
<name>banseon-maven</name>
<url>http://www.baidu.com/banseon</url>
<description>A maven project to study maven.</description>
<prerequisites>
<maven />
</prerequisites>
<issueManagement>
<system>jira</system>
<url>http://jira.baidu.com/banseon</url>
</issueManagement>
<ciManagement>
<system />
<url />
<notifiers>
<notifier>
<type />
<sendOnError />
<sendOnFailure />
<sendOnSuccess />
<sendOnWarning />
<address />
<configuration />
</notifier>
</notifiers>
</ciManagement>
<inceptionYear />
<mailingLists>
<mailingList>
<name>Demo</name>
<post>banseon@126.com</post>
<subscribe>banseon@126.com</subscribe>
<unsubscribe>banseon@126.com</unsubscribe>
<archive>http:/hi.baidu.com/banseon/demo/dev/</archive>
</mailingList>
</mailingLists>
<developers>
<developer>
<id>HELLO WORLD</id>
<name>banseon</name>
<email>banseon@126.com</email>
<url />
<roles>
<role>Project Manager</role>
<role>Architect</role>
</roles>
<organization>demo</organization>
<organizationUrl>http://hi.baidu.com/banseon</organizationUrl>
<properties>
<dept>No</dept>
</properties>
<timezone>-5</timezone>
</developer>
</developers>
<contributors>
<contributor>
<name />
<email />
<url />
<organization />
<organizationUrl />
<roles />
<timezone />
<properties />
</contributor>
</contributors>
<licenses>
<license>
<name>Apache 2</name>
<url>http://www.baidu.com/banseon/LICENSE-2.0.txt</url>
<distribution>repo</distribution>
<comments>A business-friendly OSS license</comments>
</license>
</licenses>
<scm>
<connection>
scm:svn:http://svn.baidu.com/banseon/maven/banseon/banseon-maven2-trunk(dao-trunk)
</connection>
<developerConnection>
scm:svn:http://svn.baidu.com/banseon/maven/banseon/dao-trunk
</developerConnection>
<tag />
<url>http://svn.baidu.com/banseon</url>
</scm>
<organization>
<name>demo</name>
<url>http://www.baidu.com/banseon</url>
</organization>
|
其他配置信息参照:
Maven仓库
任何一个构件都有唯一坐标,Maven根据这个坐标定位了构件在仓库中的唯一存储路径
Maven仓库分类两类:
- 本地仓库
- 远程仓库,远程仓库分为三种:
- 中央仓库
- 私服
- 其他公共仓库
本地仓库
本地仓库时Maven在本地存储构建的地方,在安装Maven时不会被创建,在第一次执行Maven命令时才被创建
Maven本地仓库的默认位置:用户目录下的.m2/repository/
还可在conf/settings.xml中修改本地库的位置
1
2
|
<localRepository>D:/myworkspace/Maven/repository</localRepository>
|
远程仓库
用于获取其他人的Maven构件
中央仓库
默认的远程仓库,Maven在安装时,自带的就是中央仓库的配置
所有的Maven都议会继承超级POM,超级POM中包含如下配置:
1
2
3
4
5
6
7
8
9
10
11
| <repositories>
<repository>
<id>central</id>
<name>Cntral Repository</name>
<url>http://repo.maven.apache.org</url>
<layout>default</layout>
<snapshots>
<enabled>false</enabled>
</snapshots>
</repository>
</repositories>
|
中央仓库包含了绝大多数流行的开源Java构件,以及源码,作者信息,SCM,信息,许可信息等
还可以在里面配置优先使用的镜像,比如在国内直接连接中央仓库较慢,一般使用阿里的镜像
1
2
3
4
5
6
7
8
9
10
|
<mirrors>
<mirror>
<id>alimaven</id>
<name>aliyun maven</name>
<mirrorOf>central</mirrorOf>
<url>http://maven.aliyun.com/nexus/content/groups/public/</url>
</mirror>
</mirrors>
|
私服
私服时一种特殊的远程仓库,它时架设在局域网的仓库服务,私服代理广域网上的远程仓库,供局域网的Maven用户使用。当Maven需要下载构件的时候,它从私服请求,如果私服上不存在该构件,则从外部的远程仓库中下载,缓存在私服上之后,再为Maven的下载请求提供服务
优点
- 加速构建
- 节约带宽
- 节约中央Maven仓库的带宽
- 稳定(应对一旦中央服务器出问题的情况)
- 可以建立本地内部仓库
- 可以建立公共仓库
如果没有特殊需求,一般只需要将私服地址配置为镜像,同时配置其代理所有的仓库就可以实现通过私服下载依赖的功能。镜像配置如下:
1
2
3
4
5
6
| <mirror>
<id>Nexus Mirror</id>
<name>Nexus Mirror</name>
<url>http://localhost:8081/nexus/content/groups/public</url>
<mirrorOf>*</mirrorOf>
</mirror>
|
可以使用Docker搭建Nexus私服,私服可以有用户名和密码,可以在settings.xml中配置
Maven项目模板(了解)
Archetype时一个Maven插件,其任务是按照其模板来创建一个项目结构。
执行如下命令即可创建Maven项目模板
常用archetype有两种:
- maven-archetype-quickstart默认的Archetype
- maven-archetype-webapp
创建webapp可以使用如下命令
1
| mvn archetype:generate -DgroupId=com.ender -DartifactId=seckill -DarchetypeArtifactId=maven-archetype-webapp
|